Traditional Art
Traditional art offers you amazing chances to experiment with various materials and techniques. Don't be afraid to mix whatever you can – with everything (even with non-artistic materials) you can create amazing stuff! I want to show you some good combinations I often use while creating my pictures.
Materials:

-Various coloured pencils (on this picture I used these):
 Faber-Castell Polychromos
Faber-Castell Art Grip
Derwent Studio
Derwent Coloursoft
Prismacolor Premier
(Why so many? Because every pencil brand and type is unique with their colour variety, quality, blending, softness/hardness. Mixing pencils with the other brands is the key to the success – really (Smile)") If you want – next time I can make tutorial about coloured pencils only)
If you want – next time I can make tutorial about coloured pencils only)
- Airbrush
- Aquarells (I am using Schmincke Akademie Aquarell)
- Acrylic inks (using Schmincke, Ecoline, Liquitex Ink)
- Technical alcohol
- Markers (using COPICs)
- A3 Bristol (using Canson)
- HB pencil, mechanical pencil
- Toothbrush
- Brushes
- Eraser
- Quill
- Tissue for smudging
- Fixative spray
Let´s get started!
2) Now lets prepare your workplace for airbrushing. You should now know which scenery you want to have on the paper.
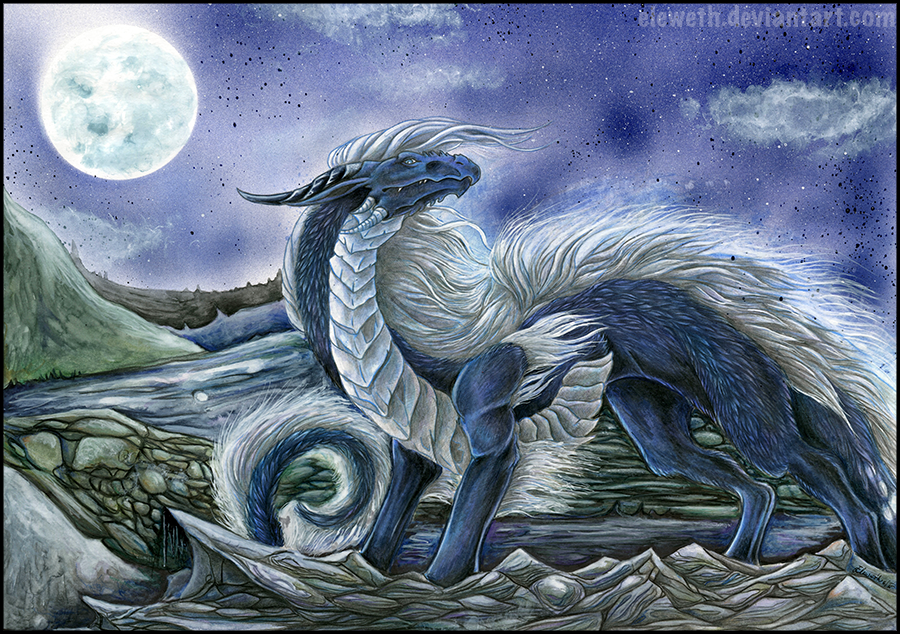
For this one I picked up the fantasy night scenery where the moon will be in the top left corner. I will need airbrush (with compresor), some acrylics ink, brushes for preparing colours, toothbrush and a bit of technical alcohol. And I needed something with a round shape so I used a little mug which will represent the shape of the moon.
 Hint: I can also recommend you use an OLD CD/DVD instead of a mug – but for this picture a CD/DVD would be kinda huge.
 ") I also highly recommend you cover your floor/table with newspapers if you're planning to airbrush – cleaning the dry acrylic ink is really annoying
I also highly recommend you cover your floor/table with newspapers if you're planning to airbrush – cleaning the dry acrylic ink is really annoying
Hint: Feel free to spray a little paint to the character/other scenery as well because you can cover it later and you can use it for your advantage as well. Don't move or remove your mug until you finish your spraying completely!
Hint: it's always better to start colouring the background first so you can fit the character easier into the environment.
Hint: I usually don't use black during shading – only in situations where its dark or there is night scenery like this one. You should always adapt the tone of your shadows to the environment!
Hint: If I still don't feel like it's quite right, I take white acrylic ink again and using my finger I put in some white spots untill I am happy with the results.
Hint: I don't recommend the regular white ink – it doesn't give the best effect. But you can use a good white gel pen. Make sure it has a good point and isn't plugged with paint.
I hope you enjoyed my tutorial and you become more confident with mixing various techniques together. It's fun and in my opinion art should be fun!
Materials:
-Various coloured pencils (on this picture I used these):
(Why so many? Because every pencil brand and type is unique with their colour variety, quality, blending, softness/hardness. Mixing pencils with the other brands is the key to the success – really
- Airbrush
- Aquarells (I am using Schmincke Akademie Aquarell)
- Acrylic inks (using Schmincke, Ecoline, Liquitex Ink)
- Technical alcohol
- Markers (using COPICs)
- A3 Bristol (using Canson)
- HB pencil, mechanical pencil
- Toothbrush
- Brushes
- Eraser
- Quill
- Tissue for smudging
- Fixative spray
1) Lets start with the sketch - I chose a random dragon creature covered with fur and little bit of background – just to know about the composition of the whole picture.

2) Now lets prepare your workplace for airbrushing. You should now know which scenery you want to have on the paper.
For this one I picked up the fantasy night scenery where the moon will be in the top left corner. I will need airbrush (with compresor), some acrylics ink, brushes for preparing colours, toothbrush and a bit of technical alcohol. And I needed something with a round shape so I used a little mug which will represent the shape of the moon.
3) First prepare your colours to the tone you want – feel free to combine the brands but be carefull that your colours are suitable for airbrushing and also don't forget to clean your pistol each time you use it! And just start spraying – I usually use for the night sky about 3-4 different shades of blue and a bit of black. I add a little splashe of technical alcohol for a little bleachy effect.


Hint: Feel free to spray a little paint to the character/other scenery as well because you can cover it later and you can use it for your advantage as well. Don't move or remove your mug until you finish your spraying completely!
4) Now let's do some stars and clouds. For the stars, the best thing you can do is use an OLD toothbrush. Just put some colour into it and then use your finger to make a "splash effect" on the sky. I highly recommend you cover parts of the picture that you don't want to splash because these splashes can make really hard "plastic" dots and it's unconfortable to work with other materials over them.
And as for the colouds – if you don't mind getting dirty the best thing you can do is use the same white acrylic ink and your finger ;D your fingerprint can do really nice "cloudy" effects


And as for the colouds – if you don't mind getting dirty the best thing you can do is use the same white acrylic ink and your finger ;D your fingerprint can do really nice "cloudy" effects
5) When your starry night is finished let it dry for a while (luckily the acrylic inks dry almost instantly but I still like to give it some time until I am sure it's completely dry) and we can start colouring the rest of the background. I will choose Schmincke Aquarell now and start working with the "furthest" part of background.

Hint: it's always better to start colouring the background first so you can fit the character easier into the environment.
For some special bleachy effects you can use some technical alcohol on the wet paint – see what is does!

Slowly continue until the whole picture has base colours – make sure they're not too light or too dark.

6) Then grab some markers and tone your picture– you can play with these colours a lot here and it will create nice undertones and shades which will work to your advantage later. Just set your feelings free and don't be afraid.

7)The next stage is coloured pencils. I started with the rocks. Stylized rocks are fun to draw and you can experiment a lot! First I will make a lineart of the rocks. As you can see in the picture I have started with the rocks at the front. I usually do this part with a Black Derwent Coloursoft pencil.
After the lineart is done I start colouring the rocks themselves – for this I use Coloursoft + Prismacolor pencils combo (these two brands are awesome for backgrounds and can be easily blended together. After the base colours are done I use a COPIC blender (or you can use regular alcohol – there is no difference) to blend everything together. You can use more alcohol (I am usually using them on the parts where light should fall) to bleach the pencils.
After this stage I used the black pencil again and did some lineart on the stones and other black details on the stones as well.
After I finished this I used fixative spray.


After the lineart is done I start colouring the rocks themselves – for this I use Coloursoft + Prismacolor pencils combo (these two brands are awesome for backgrounds and can be easily blended together. After the base colours are done I use a COPIC blender (or you can use regular alcohol – there is no difference
After this stage I used the black pencil again and did some lineart on the stones and other black details on the stones as well.
After I finished this I used fixative spray.
8) Then we start working on the character itself. I prepared a small lineart with coloured pencils – I recommend the most hard and sharp ones to have full control on the details – that's why I used Faber-Castell Art Grips and Derwent Studio ones.

After the lines are done I took some Polychromos and Prismacolor pencils and did some shades on the fur.

And then I used a blender and some alcohol again to blend the pencils and marker underpaint together.

Then I used black Polychromos to make the darkest shadows and fur base. Don't forget to check if your fur is growing in the correct direction!


Finally, just use Dark Indigo Polychromos and put some more shadows into your fur. Because you used lots of different colours and blending in your underpaint there is nothing much more to do.

You can use some Black Polychromos to highlight darkest shades here.

Hint: I usually don't use black during shading – only in situations where its dark or there is night scenery like this one. You should always adapt the tone of your shadows to the environment!
9)Use the same method for pencil colouring on the white fur and scales but instead of blender/alcohol use white pencil (Derwent Coloursoft in my case).

10) Then I started colouring the moon. I usually make some blue-grayish paint from acrylic ink and with the brush I place a little bit of colour into the space for the moon. After that I used some tissue and with taping I put in some texture.


Hint: If I still don't feel like it's quite right, I take white acrylic ink again and using my finger I put in some white spots untill I am happy with the results.
11) Now it looks almost finished but we need some highlights to make the picture feel more alive. For this you need your quill and white acrylic ink. Shake your ink a little to have a thicker consistency and use it for the fur and light in the eye. This will create the thinnest lines. You can also take a brush and do some highlights on the scales and/or horns as well.


Hint: I don't recommend the regular white ink – it doesn't give the best effect. But you can use a good white gel pen. Make sure it has a good point and isn't plugged with paint.
12) For the final step, I took a mechanical pencil to fill some tiny details and then used fixator for the whole drawing and placed my signature with the pen at the top.  (Wink)")
Discuss:
Have you used mixed media?
If yes do you like it or do you prefer to work with just one medium?
Are you interested in more tutorials/detailed descriptions about various materials?